Whitelisting & filtering traffic
There are cases in which you might have to whitelist Checkly traffic in your firewall, load balancer or other to prevent it from being blocked or skewing analytics data. Below are some solutions to help you achieve that.
IP range whitelisting
Whitelisting Checkly traffic by IP address or range is not possible at this moment, as Checkly uses a non-static set of IP addresses in the cloud to run its checks.
You can however fetch a list of the dynamic IP addresses in use at AWS, our cloud provider.
Header/user agent whitelisting
If you are using Cloudflare or a similar provider, one or more of your automated checks might trigger a bot detection mechanism.
If you want to prevent that from happening without exposing your website to any and all automated traffic, you might want to set up a new firewall rule allowing traffic from Checkly as long as it contains a specific header or sets a certain user agent.
You can make the header and/or user agent specific to your own Checkly user account by grabbing the first eight digits of your unique user ID (or another fixed value of your choice), which you can find below your account name on the Account Settings page. Embedding this value in your checks will enable them to be allowed through by your firewall rules.
Whitelisting API checks using headers
To whitelist API checks, allow traffic that contains a cookie in the shape of Cookie: "checkly-account:<UUID>", with <UUID> being your shortened Checkly ID or other chosen value.
You can then set the Cookie header while editing your check.
Whitelisting browser checks with user agents
To whitelist browser checks, allow traffic with user agent containing Checkly/<UUID>, with <UUID> being your shortened Checkly ID or another chosen value.
You will then be able to set up the matching user agent in your browser checks using Playwright’s userAgent property.
import { test } from '@playwright/test'

const myUserAgent = 'Mozilla/5.0 (X11; Linux x86_64) AppleWebKit/537.36 (KHTML, like Gecko) Chrome/78.0.3904.108 Safari/537.36 Checkly/abcd1234'

test.use({ userAgent: myUserAgent })

test('my user agent test', async ({ page }) => {
  // ...
})
const { test } = require('@playwright/test')

const myUserAgent = 'Mozilla/5.0 (X11; Linux x86_64) AppleWebKit/537.36 (KHTML, like Gecko) Chrome/78.0.3904.108 Safari/537.36 Checkly/abcd1234'

test.use({ userAgent: myUserAgent })

test('my user agent test', async ({ page }) => {
  // ...
})
Filtering Google Analytics
If you want to filter Checkly traffic in Google Analytics to prevent Checkly browser checks from skewing your numbers, here is one way to do it:
- Add a UTM source tag to the URLs your requesting, i.e.:
await page.goto('https://app.checklyhq.com/login?utm_source=monitoring')
- In Google Analytics, filter on campaign source.
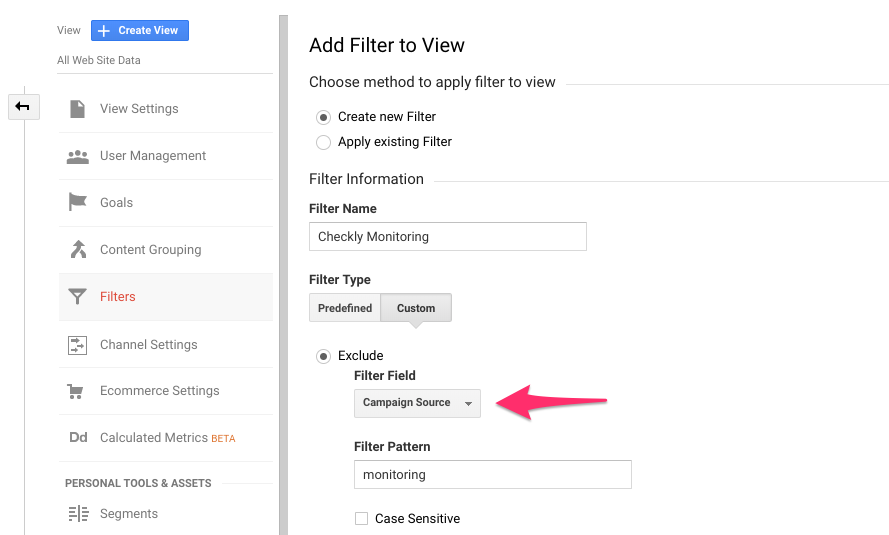
For detailed instructions, see the Google Analytics docs on custom filters.
Default Checkly user agent
This is what Checkly sends as user agent:
- API checks:
Checkly/1.0 (https://www.checklyhq.com). - Browser checks:
Checkly, https://www.checklyhq.com.
Changing the user agent of a check will not change the browser or browser version, it will simply set a new string for user agent.
![]() You can contribute to this documentation by editing this page on Github
You can contribute to this documentation by editing this page on Github